
What You'll Create
In this guide, you will create a short voiceover with VMAI AI TTS Voice Generator.
By the end, you will be able to:
- enter text and understand the 5,000-character limit;
- use TTS Script Preprocessing for numbers, symbols, and abbreviations;
- choose language and voice together;
- adjust speed and, when supported, emotion or tone;
- choose between browser generation and server generation;
- play the result and download MP3 or another available format;
- understand history, saved results, and timeline workflows when signed in.
Before You Start
What you need
- A short script. Start with one to three sentences for the first test.
- A desktop browser. Device generation for voices marked Free can depend on browser capability and whether the tab stays active.
- A VMAI account if you want server generation, history, My Voices, or some output formats.
- Credits for server generation. The page shows the estimated cost before you start.
When should you use this tool?
| Situation | Why it helps |
|---|---|
| You need narration for a product demo | Turn a script into an audio file quickly. |
| You want to test short-form hooks | Compare several voice directions with short sentences. |
| You need temporary voiceover before editing | Use browser generation to hear a sample without spending Credits. |
| You need a repeatable brand voice | Use history and My Voices workflows when signed in. |
Step 1: Open AI TTS Voice Generator
Open AI TTS Voice Generator.
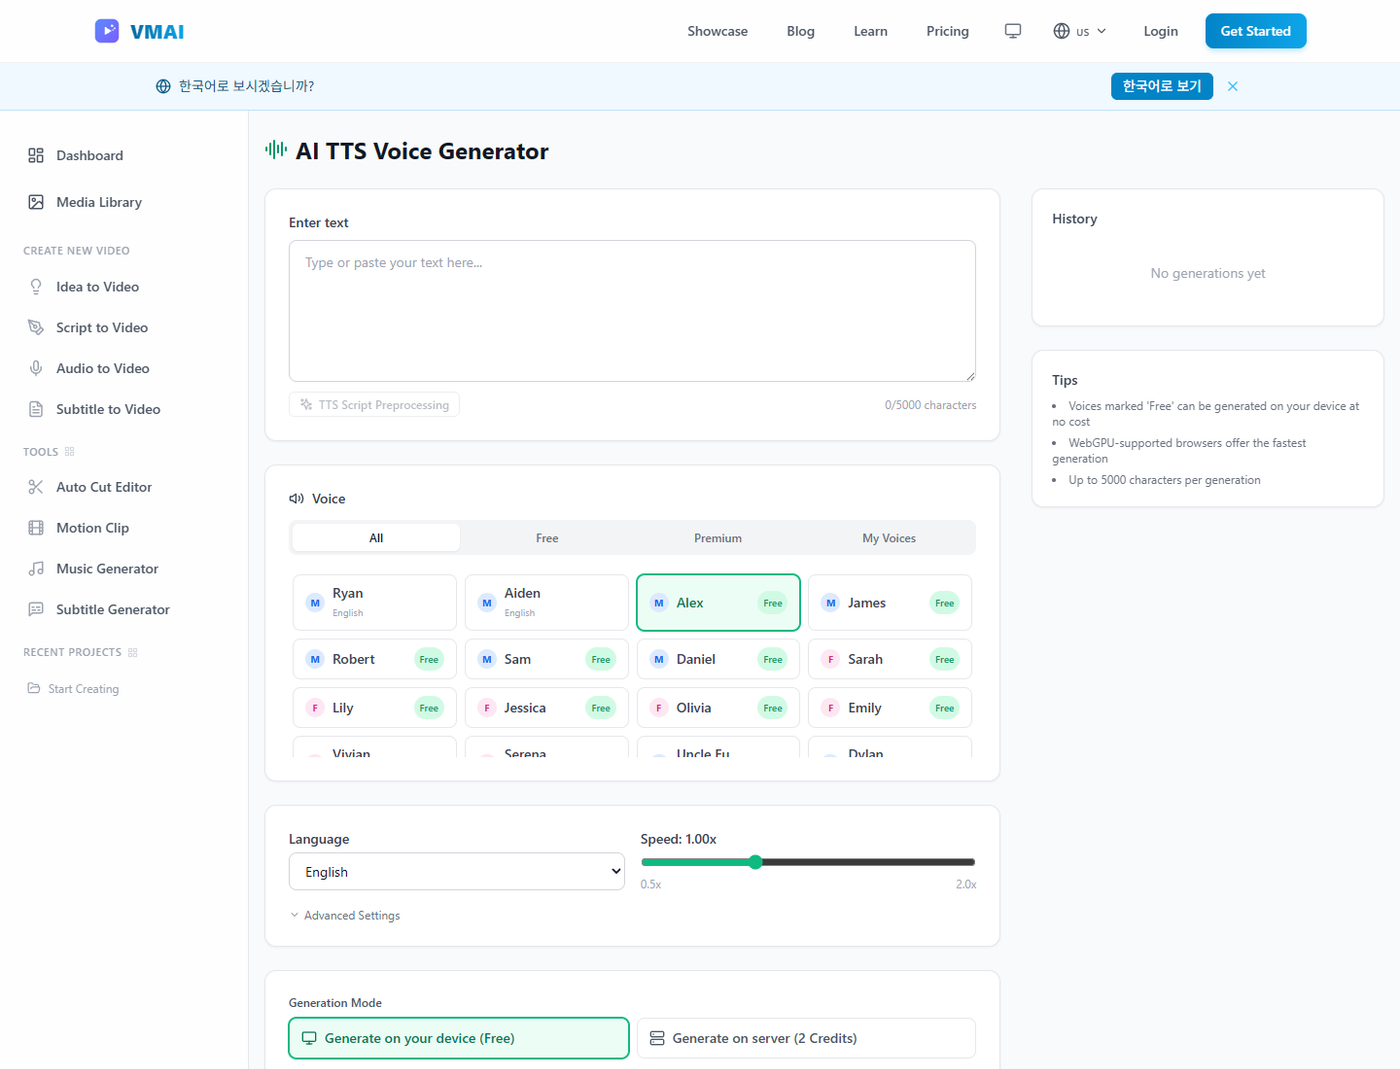
AI TTS Voice Generator screen: enter text, then choose voice, language, speed, and generation mode in one workflow.
The page has three main areas.
| Area | What it does |
|---|---|
| Left input area | Enter the script, preprocess it, choose a voice, and adjust language and speed. |
| Generation mode area | Choose the currently available browser or server generation mode. |
| Right panel | Review history and tips. After generation, this area shows playback and download controls. |
For the first test, use a short sentence instead of a full script. You are testing tone and workflow, not creating the final file yet.
Step 2: Enter and preprocess the text
Paste the voiceover script into the text area. In the current implementation, one generation accepts up to 5,000 characters.
Before generating, clean up the script.
- Make dates, numbers, prices, and units sound natural.
- Check whether symbols and abbreviations should be expanded.
- Split very long sentences.
- Add blank lines where the scene or section changes.
When useful, run TTS Script Preprocessing. The processed text appears in a separate editable area, so you can review it before generating.
Step 3: Choose language and voice
Next, choose Language and Voice.
The voice panel includes these tabs.
| Tab | Use it for |
|---|---|
| All | View available voices for the selected language. |
| Free | Find voices that can be generated on your device. |
| Premium | Compare server-focused voice options. |
| My Voices | Select custom voices created by the signed-in user. |
Choose the language first, then narrow the voice list. Some voices are optimized for a specific language, and VMAI can warn when the selected voice may not match the selected language well.
A safe first pass:
- choose the main language of the video;
- pick a short sample voice from the Free tab;
- compare server voices or My Voices only when the final tone matters;
- consider separate voices for separate languages in multilingual videos.
Step 4: Adjust speed and advanced settings
The speed slider runs from 0.5x to 2.0x. Start at 1.00x, listen, then adjust in small steps.
Speed guide
| Video type | Safer approach |
|---|---|
| Tutorial or lesson | Stay near 1.00x and prioritize clarity. |
| Short-form hook | Test slightly faster delivery, but keep words distinct. |
| Product demo | Match the speed of the screen actions. |
| Brand video | Listen with the background music before deciding. |
Emotion / Tone
Some voices support natural-language emotion or tone instructions. Keep them short, such as “calm and clear” or “cheerful and energetic.”
Output format and economy mode
Advanced settings show output format and, when available, economy mode for faster or lower-cost server generation. Free plans can use MP3; WAV can be unlocked on paid plans.
Step 5: Choose a generation mode
The available mode depends on the selected voice, device, and sign-in state.
| Mode | What it means | Check first |
|---|---|---|
| Generate on your device | Generate voices marked Free in the browser. | First use may require a model download, and the tab should stay active. |
| Generate on server | Process on the server and use Credits. | Confirm sign-in, remaining Credits, and the cost for this generation. |
The page shows This generation: Free or This generation: N Credits before you generate. Read this line before using server generation.
For a new script, make a short browser sample first. Use server generation when the final voice direction or required voice option is clear.
Step 6: Generate and review the result
Click Generate Voice when the settings are ready.
During generation, the page shows progress or status messages. Browser generation can depend on your device, so keep the tab active and avoid heavy background work. Server generation waits for processing, with backend safety checks for failures and timeouts.
When audio is ready, review it before downloading.
- Play the full result.
- Check numbers and abbreviations.
- Listen for pauses between sentences.
- Make sure speed and tone match the video pacing.
- Regenerate only the scene that needs a fix.
Download MP3 when the result is ready. If your plan supports it, WAV may also be available.
Step 7: Use history, downloads, and timeline workflows
Signed-in users can save browser results to history, and server-generated results can support timeline workflows.
Do not assume history is permanent storage. Result files can expire based on plan policy, so download important audio locally.
For repeatable work, keep these together:
- final script;
- language and voice;
- speed and tone instruction;
- browser or server generation mode;
- downloaded filename and video project.
This makes it easier to match the same voice style in the next video.
Optional: Use My Voices
My Voices lets signed-in users manage custom voices. You can create a voice from reference audio or design one from a text description.
Permission is the key rule.
- Use only your own voice or a voice you have permission to use.
- Prepare a short, clear reference audio clip.
- Creating a custom voice uses Credits.
- For a team or brand channel, document when custom voices are allowed.
Start with built-in voices while learning the workflow. Move to My Voices only when you truly need a repeatable custom voice.
Checklist
Before generating, confirm:
- The script is prepared for listening, not only reading.
- Language and voice match.
- The text stays under the 5,000-character limit.
- Long scripts are split by paragraph or scene.
- Speed is adjusted gradually from the default.
- Server generation cost and remaining Credits are checked.
- The result is downloaded, and the script/settings are stored.
- Custom voice permission is clear if My Voices is used.
Next Step
After you create a voiceover, continue into the video workflow.
- To create a full video, open Create New Video and choose audio or script input mode.
- To use generated audio in an existing project, check the timeline add flow for server-generated results.
- To decide which voice generation settings matter first, read 7 Checks Before You Use an AI Voice Generator.
Tutorial Complete!
You've read this tutorial. Move on to the next step.
Preview and Reuse Caption Styles with Subtitle Style Editor
Create Background Music with AI Music Generator
Found this tutorial helpful?
Subscribe to get notified when we publish new tutorials and guides. No spam, unsubscribe anytime.
Comments
Please login to leave a comment
LoginNo comments yet. Be the first to comment!